
I AM HAVING A 50% OFF SALE ON EVERYTHING- INCLUDING CUSTOM ITEMS- IN MY SHOP!!!
I am working on some new items I have drafted patterns for,
it would be great to clear out past creations
COUPON CODE: SPRING
THE SALE ENDS MAY 7TH!


 This pattern is one I recently drafted. The size I drafted it in was fine for my five year old and also on me! You can make one using cotton fabric with fun prints! Or various colours! Or silks with some pretty subtle decor!


 The brim is also very beautiful folded back at an angle! This is just another of the many ways this can be worn!!
 È anche possibile trovare alcuni modelli per un prezzo ragionevole, se non gratuitamente.


An active stitcher or costume technician can spend so much money on interfacing, they certainly are costly. I have have found over the years that I rarely us them. Of course they are some things in which only interfacing will do. For collars, waistbands, and cuffs are a few examples. But mostly for my creating I only use flat-lining.
I was slightly surprised that not everyone uses this technique. As I found out through private sewing classes that I teach, many had not even heard of it!
I have vastly used this technique in the construction of theater and opera. In classic tailoring it is a must- only it is done by hand. What is Flat-lining? Basically it is a technique used to stiffen or to give a different feel or body to a fabric which does not. I usually use fabrics that are firm and stiff but not heavy, fabrics such as denium, or canvas. Therefore you can go shopping at Joann's or Wal-mart in their bin fabrics! It can be any color or fabric as long as it has the right body.
Note- The most important thing to remember is that you must wash and press the fabric before you use it. You definitely do not want it to shrink!
It can be difficult to explain so I decided to write a tutorial of sorts, with step-by-step photos. Here goes:
1. Chose your fabrics
My Fabrics: 
I am using a white canvas fabric and a almost sheer silk I will be making one of my cuffs with lacing. After washing and pressing I am ready to go.
2. Draw pattern pieces on to canvas

These are my three pattern pieces which I have drawn onto the canvas.
Take note of the third piece containing stitching! You will see it again in step 4, I got a little ahead of myself.
3. Place canvas on to fabric. This is the fabric you are wanting to show.
The Pins: 
I placed my canvas piece on to the wrong side of my silk. Then I begin pinning - first the center, then the corners, and the sides. Note that my pins are placed perpendicular to my stitching line with the points towards the seam-allowance. Placing the pins in this manner allows you to easily pull out the pins as you stitch.
As you pin, make sure your fabric is smoothed so your fabrics are completely flat.
4. Using a basting stitch, stitch the two fabrics together.

I find it best to stitch along the sides first, lengthwise, then the tops and bottoms. Removing the pins as you stitch. Make sure you stitch 1/8 of an inch outside the stitching line towards the seam allowance.
After stitching all the pieces, press them. Make sure they are nice and flat.

5. Stitch the pieces together.

Just stitch normally right on the stitching line.
Final step

After stitching the pieces together, press. Then finish off your seam allowances as your normally would.
Here you can see the silk has a stiffness which is needed for my cuff. It now has it's own body and form.
This technique can be used with any two fabrics. It just depends what your project is. It is certainly nice not to have to shell out all those bucks for something you can do for less! I find it also works better for me.
Hope this was compressible. Please make sure to contact me if you have questions!
This coming Thursday is the last day for the extended deadline for the Singer/Craftzine Swimsuit Cover-up Contest! I am in great need of a new sewing machine, which is the main prize! I am keeping my fingers crossed!
This is the first cover-up that I made. I thought it would be more of a challenage if I converted scarves into cover-ups. The characteristics of these lovely summer scarves are just want I was looking for. Something, fresh, and wispy!

This was the first cover-up I constructed for the contest. I used a pleated sheer scarve and a silk square one with a floral print. I entirely draped this one, I used the printed floral scarve on the bias, to stay close to the body. I was also able to play with the printed design as well. Here you can see the front view.
Back View
For easy wear and removal, I used a separating zipper on the right side seam. All the hems are finished off by a hand-stitched rolled hem. I love how it just flows!
This are the two scarves used for the second one:

The first one is made of a linen-silk blend It contains lovely stripes to play with! The second I just thought was amazing. I had to incorporate it into my cover-up! It is a lovely silk scarve with asian crain motif. I think most likely printed then hand-painted, I purchased it for two euros at the Saturday morning mercato.


Here you can see the front and the back. I flat-patterned the top, which then determined what the skirt portion would be. It is a wrap cover-up, the ties come from the sides and tie at the front. This again contains easy wear and removal.
On the top portion I wanted to play with the stripes. The bust pieces match up perfectly with the armscye pieces. It contains and open back.
So those are my two enteries! It was a very enjoyable project!
We shall see what happens this week!
P.S. Oh! Thanks so much to my wonderful model. It does wonders on a person rather than my dress form!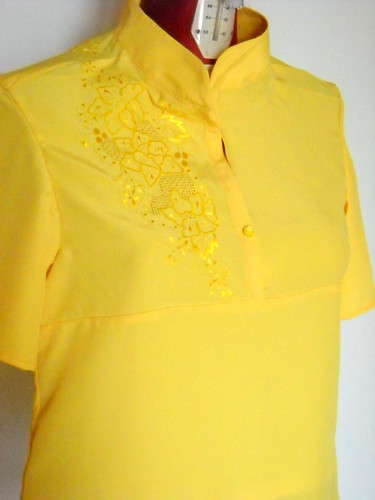
So my first blouse is now completed and delivered to the client!
For the first blouse I chose to place one embroidery design on the front right side, the second is on the back right side. I wanted to attain a movement of the two decorative pieces.
Again because the decorative pieces were so close to the selvage I had to alter my pattern. For this project it was simpler to flat-pattern the blouse, and I took it from there.
The front contains two center-front piece at breast level, one containing the decorative piece with a front closure of one button. Below the breast-line I had to break up the front pattern piece for the placement of the decorative piece.
For the collar I thought it would be nice to use a mandarin collar . Being that the fabric is from Vietnam, I wanted to give the over all design a nice fresh feel! The back contains a center-back seam and the other decorative piece on the right back shoulder.
One project completed, one more to go!!

